General General is the first choice. Highlight the word and select with the right arrow. This opens the "General" Menu page.
Track & Train


The first selection is "Track & Train." This allows your TEK system to be both a GPS Tracking system and a Remote Training collar. If you have selected to only use the tracking portion, then highlight the words "Track & Train" and press the right arrow key. This will change it to "Tracking Only." "Tracking Only" cuts off all of the Remote Training collar settings in the menu sections. It also removes the Dog Training screen from the Main Menu and from the handheld. To turn "Training" back on, highlight the words "Tracking Only" and use the right arrow. This reactivates all of the Training functions.
Stim Levels


This allows you to set the number of Stimulation levels your TEK remote training collar uses from 2 to 99. The number you have selected will appear to the right of the words "Stim Levels." If you have it set on 75, the screen will show "Stim Levels: 75." To change the number, highlight the word stim levels and press the right arrow. This will highlight the number. Use your up and down arrow keys to increase or lower the number. Once you reach the level that you want, use the left arrow key to select that number. If you are on the number 2, you can use the down arrow to move the number to 99. The Stim level is a universal setting and will apply to every collar in your system.
Stim Tracking


Stim Tracking allows you the option of being able to correct your dog from the Tracking Screen. When Stim tracking is turned on, the three left side buttons on the handheld are the stim buttons for Dogs 1, 2, and 3 in the tracking screen. The stim level from the tracking screen is shown next to the dog's name in the tracking screen. The selected level is the first level that you set in the Dog Training Screen.
For example - If you have selected your top button in the training screen as "Continuous" and your level is set on 10, then in the Tracking screen it will have "C10" listed to the right of your dog's name. Raising or lowering the Continuous level from the Training Screen will change the setting in the tracking screen. You can also change the top button to allow you to use Tone, Vibration, Momentary, Preset levels or Rising Stimulation in the Tracking screen. From the Tracking screen you only have access to the upper stimulation choice. To select the other two stimulation options, you will have to move from the Tracking screen to the Training screen. Once on the training screen, you have access to all three buttons and can raise or lower your continuous, momentary or rising stim settings.
If you decide to allow stimulation from the tracking screen, it is very important to always know which screen you are on before you start correcting dogs. Keep in mind that when you are in the Tracking screen it's one button per dog but when you move to the training screen all three buttons will now correct the one dog that is on the training screen. When I use Stimulation from the Tracking screen I always make sure I return to the Tracking screen once I have finished making any changes to the setting levels on the individual dogs Training screen.
If you do not want to be able to make corrections from the Tracking screen, select Stim Tracking and use the right arrow to change it to No. The stim levels will still show in the tracking screen but they will no longer be active.
Stim Buttons

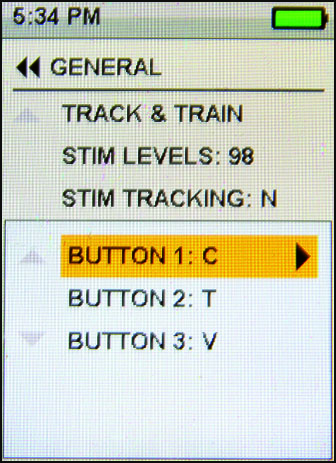
Stim Buttons allows you to set up the listing of Stim choices automatically applied to any new collar you add to your system in the future. To make the changes, highlight Stim Buttons and press the right arrow key. A pop up window appears with selections for Button 1, Button 2 and Button 3. Select the button you want to change and press the right arrow. Pick between Continuous, Momentary, Tone, Vibration, Rising, Preset 1 and Preset 2. Pick the one you want using the up and down arrows. Once you have picked the right one, use the left arrow key to set it. Repeat for buttons 2 and 3. When you add a new dog to the Ecollar part of the system, this button set up will automatically be set. Keep in mind that you can change the order or selection from the individual dogs profile. You do not have to have the same button selections for each dog if you want them to be different.
Action


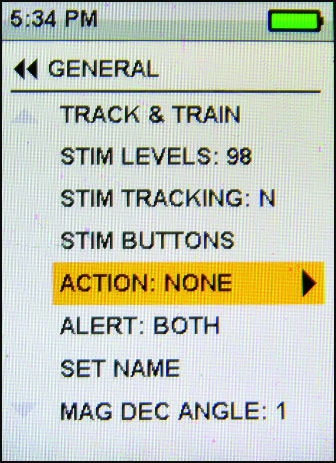
The Action selection allows you to tell the handheld if your dogs are Pointing dogs or Treeing dogs. You can pick between "On Point" or "Treed." To make your selection, highlight "Action" and hit the right arrow. Once it has your choice, hit the left arrow. Action is a universal setting. Either your entire dog list is set "On Point" or "Treed." You can not have some collars set as pointers and some collars as hounds. If you run both kinds of dogs, you can make the change in the menu before a bird hunt and then change it back before a coon hunt. It's pretty simple. There is a complex algorithm that takes into account the dogs velocity and angle for treed. Point is just a lack of movement. There is a algorithm that takes into account the dogs velocity and angle for to show that the dog is treed. Indication of a dog on point means there is a lack of movement.
Alert


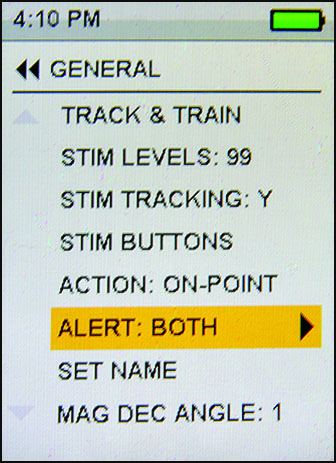
The Alert option allows you to choose the way the handheld tells you that your dog has gone on point or has treed. You have a choice between Vibe (the handheld will vibrate), Tone (the handheld will beep), Both (Vibe and Tone) or None (no alert when the dog goes on point or trees.) To select the one you prefer, highlight the the word ALERT and use the right arrow to scroll through the choices. Once you have the one you want, use the left arrow to select it.
Set Name

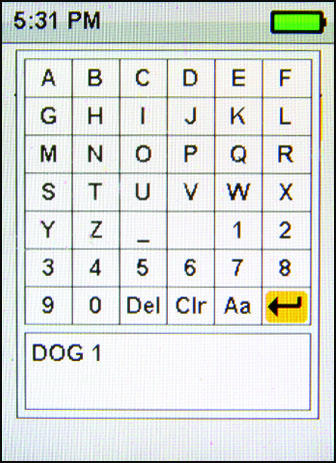
This feature allows you the option of naming your handheld. This can come in handy if you have several folks that you hunt with or if you own multiple units. To name your handheld, highlight the word SET NAME and press the right arrow key. This will take you to the Alphabet screen. Use the Arrow keys to move around on the screen to select the first letter you need. When you move over a letter it will be highlighted. Once you get to the letter you need, use the lower right side button to select it. The selected letter will appear in the box at the bottom of the screen. Use the arrow key to select the next letter. To change from capital letters to small letters, click the Aa button. If you need to delete a letter, use the Del key or use the Clr key to clear all and start over. Once you have finished naming your unit, select the "return" key and press the right side bottom button.
Mag Dec Angle
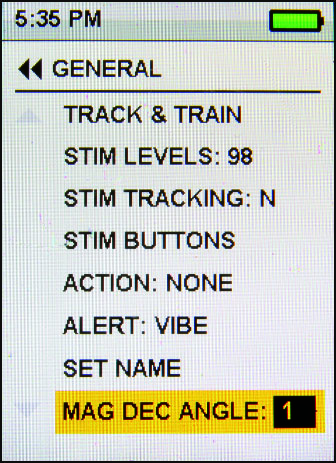
Magnetic Declination Angle - Magnetic declination is the slight difference between magnetic north and true north. To get the correct number for your location go to http://www.ngdc.noaa.gov/geomag-web/ and enter your zip code. Incorrect magnetic declination will result in inaccurate compass readings. Once you have the correct number for your location, highlight Mag Dec Angle and press the right arrow key. Use the up and down arrow key to select the correct number (Magnetic declination ranges are from -70 to 70.) The default is 0. Press the left arrow to set your number. Keep in mind that when you change locations by a few hundred miles, it's smart to recheck your number and change it to the new location number. |